“It’s the most wonderful time of the year” as the song says. While it’s easy to get swept up in the cooking and gift giving, we also love making arts and crafts to show our holiday spirit. I have toddlers, and usually that doesn’t mix so well with breakable ornaments if you know what I mean 🙂 . This year, we decided to make ornaments out of felt – some to hang on the tree and some to hang on a felt Christmas tree that we hung up on the wall in the kids’ play area. We had a blast and made some memories that will last a lifetime. If you’re looking for a fun and simple holiday activity while your kids are on break from school, this is it!
Here is a list of supplies. Don’t forget to pick up some gluten free glitter glue before you get started, as many glues contain gluten and can get under fingernails and be difficult to rinse completely clean.
Supplies:
- Large sheet of felt (3-4 feet long by 3-4 feet wide)
- 10 individual 8.5×11 sheets of felt in different colors
- Scissors
- Gluten Free Glitter Glue (Colorations is gluten free, and also free of eggs, latex, dairy, tree nuts and peanuts)
- Buttons, pom poms, stickers
- 1 package of velcro
- Red ribbon (if hanging on tree)
- Hole puncher (if hanging on tree)
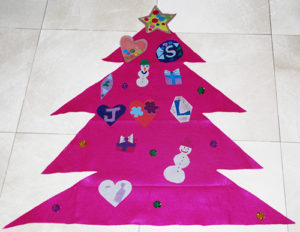
Felt Christmas Tree
Directions:
- Cut a Christmas tree out of the large piece of felt in any color you want. I recommend tracing the outline of the tree first. My daughter loves hot pink…so we decided to go non traditional.
- Cut the other pieces of felt into different shapes (circles, snowmen, diamonds, present boxes, mini Christmas trees, you name it. Whatever your child’s imagination wants to create.
- Decorate with glitter glue or use the glitter glue to stick smaller pieces of felt in different colors and shapes on top. We also like sticking buttons and other stickers on top.
- Snowman directions: Cut the body of the snowman out and place to the side. Cut two small circles in another color of felt for the eyes, a triangle for the nose, and a top hat. Attach the eyes, nose, and hat with glitter glue. Draw in a mouth and three buttons with glitter glue and then let it dry.
- Present directions: Cut a square out of felt. Then cut two thin strips the length of the square in a different color. Criss cross them and attach with glitter glue to form the “ribbon” on the present. For the bow, cut out a bow tie shape and then a small square in a different color than the rest of the bow tie to place on top. Attach to the box with glitter glue and then decorate the bow with glitter glue on top to make it stand out more.
- Once your ornaments are dry, take a velcro set and place one side on the back of the ornament and the other on the felt Christmas tree you created.
- Voila, it sticks! Repeat until your tree is fully decorated.
- To keep this fun craft going year round, consider making new ornaments to stick on the tree at different times of the year. We’ve done this by making heart shaped ornaments for Valentine’s Day in the past.
Felt Christmas Ornaments
Directions:
- Do the same steps that you did above until you get to the velcro stage.
- Instead, use a hole puncher to create a hole and tie a red ribbon through it.
- Hang the unbreakable, toddler safe ornament on your tree!
Happy Gluten Free Crafting Everyone!




Leave a Reply
You must be logged in to post a comment.